How to use GPUs conveniently on supercomputers?
GPUs are expensive resources. Most average users may only have tried the GPUs on Google Colab or the ones in their personal desktop computers. For deep learning tasks, however, those GPUs may have either not enough memory or not enough runtime. If you don’t have access to some nice GPUs dedicated to high performance computing, you can never train certain models (even rather small ones in today’s AI world) nor run many deep learning tasks. Luckily, many Ph.D. students have access to various supercomputers. For example, I can access supercomputers like Bebop, Swing from the Argonne National Laboratory, as well as Purdue Anvil, Darwin, SDSC, and a bunch other machines from the ACCESS project funded by the U.S. National Science Foundation. In this post, I hope to elaborate how we can utilize the resources conveniently.
For these supercomputers, they are usually either managed by PBS (Portable Batch System) or Slurm (Simple Linux Utility for Resource Management). I’ll use some examples to show you how we can use the computation easily on both types of systems.
First and foremost, most people start with a very small task that does not require batch jobs at all. We don’t want to submit a job and wait a long time in the queue before we know our script or code is correct. At the beginning, we may also want to just run a very small model that is fast to train and test instead of waiting for too long to see it has an error or wrong configuration. What do we do in this situation?
Interactive jobs on PBS systems
We can always submit an interactive job for this fast testing purpose. I’ll take the Swing machine at Argonne as an example.
When you log in to Swing and run your favorite command nvidia-smi, the prompt will ask you to install the command with an apt install, which means the command does not exist. And because this is not your computer, you have no authorization to install any software to the system at all. What do you do now? The GPUs actually exist, but just not on the login node usually.
Before everything, you need to know your project name. When you get access to such a supercomputer, it might look free to you but they are definitely counting your usage somewhere. So you or your PI will have a project name. I will run the following command to find out how much compute hours I have in a PBS system. Note that my project name is SDR and you should change it to yours.
1
sbank-list-allocations -p SDR
The Swing machine gives me the following output.
 Allocation  Suballocation  Start       End         Resource  Project  Jobs  Charged  Available Balance
 ----------  -------------  ----------  ----------  --------  -------  ----  -------  -----------------
 1840        1787           2025-01-01  2025-04-01  swing     SDR         2      0.1               56.9

Totals:
  Rows: 1
  Swing:
    Available Balance: 56.9 node hours
    Charged          : 0.1 node hours
    Jobs             : 2

All transactions displayed are in Node Hours. 1 Improv Node Hour is 128 Core Hours. 1 Bebop Node Hour is 36 Core Hours. 1 Swing Node Hour is 8 GPU Hours. Balances and transactions displayed will update every 5 minutes.
And the Bebop machine gives me the following output.
 Allocation  Suballocation  Start       End         Resource  Project  Jobs  Charged  Available Balance
 ----------  -------------  ----------  ----------  --------  -------  ----  -------  -----------------
 1775        1722           2025-01-01  2025-04-01  bebop     SDR         0      0.0            1,993.8

Totals:
  Rows: 1
  Bebop:
    Available Balance: 1,993.8 node hours
    Charged          : 0.0 node hours
    Jobs             : 0

All transactions displayed are in Node Hours. 1 Improv Node Hour is 128 Core Hours. 1 Bebop Node Hour is 36 Core Hours. 1 Swing Node Hour is 8 GPU Hours. Balances and transactions displayed will update every 5 minutes.
So I know I have 56.9 Swing node hours, which means 56.9 x 8=455.2 GPU hours available; and I have 1993.8 Bebop node hours, which means 1993.8 x 36=71776.8 CPU hours. They may look a lot to you. But you need to know, whether your job will use the whole node or share the node with other users. This information can usually be found on the site’s website. Swing says “You will be allocated 1/8th of the node resources per GPU. Nodes allow for multiple jobs from multiple users up until the resources are fully consumed”. So I know that I can only request 1 GPU and be charged for only 1 GPU hour when I keep the interactive job for an hour.
To request an interactive job for an hour, we can run this command.
1
qsub -I -l select=1:ngpus=1 -l walltime=01:00:00 -A SDR -q gpu
Note that
-qspecifies a queue that you want to submit the job to. On a PBS system, you can check the available queues withqstat -Qcommand. It is also helpful to check their user manual to select which queue you want to use.
It will bring you into a new node and the domain name will change. For me, the domain name changed from gpulogin1 to gpu3, which means I have logged in to a compute node with GPU. Most of the time, CUDA will have been loaded for these computing nodes. So if I run nvidia-smi, I will see the following output.
Mon Feb  3 22:08:43 2025
+---------------------------------------------------------------------------------------+
| NVIDIA-SMI 535.183.06             Driver Version: 535.183.06   CUDA Version: 12.2     |
|-----------------------------------------+----------------------+----------------------+
| GPU  Name                 Persistence-M | Bus-Id        Disp.A | Volatile Uncorr. ECC |
| Fan  Temp   Perf          Pwr:Usage/Cap |         Memory-Usage | GPU-Util  Compute M. |
|                                         |                      |               MIG M. |
|=========================================+======================+======================|
|   0  NVIDIA A100-SXM4-40GB          On  | 00000000:47:00.0 Off |                    0 |
| N/A   22C    P0              50W / 400W |      0MiB / 40960MiB |      0%      Default |
|                                         |                      |             Disabled |
+-----------------------------------------+----------------------+----------------------+

+---------------------------------------------------------------------------------------+
| Processes:                                                                            |
|  GPU   GI   CI        PID   Type   Process name                            GPU Memory |
|        ID   ID                                                             Usage      |
|=======================================================================================|
|  No running processes found                                                           |
+---------------------------------------------------------------------------------------+
Note that this GPU is NVIDIA A100, and the memory for this GPU is 40960MB (40GB), much larger than your RTX 3060 or other common consumer level GPUs. We can then create a conda environment and install the necessary Python packages and use it as your personal computer in this GPU session.
It is also convenient to run a Jupyter Notebook inside this GPU compute node, while accessing it through the browser in our local computer. To achieve this we need to start a Jupyter Notebook in this interactive session by the following command.
1
jupyter notebook --no-browser --port=8889 --ip=0.0.0.0
This will start a jupyter notebook in this compute node. We need to use ssh tunneling to access it. The ssh tunneling creates a secure tunnel for you to access a remote computer that is not accesible from public network (the gpu3 node in this case).
1
ssh -N -L 8889:gpu3:8889 ac.liu1@swing.lcrc.anl.gov
-Nsets no remote commands as we only need the tunnel;-Lsets the local port forwarding in this formatlocal_port:remote_host:remote_port. If we set it as8890:gpu3:8889, we can access it throughhttp://127.0.0.1:8890.
Now we can paste the URL and access token printed to your interative session to access the Jupyter Notebook from our local browser.
Interactive jobs on Slurm systems
I will do the same thing on a Slurm system, and take Purdue Anvil as an example. Purdue has an ondemand website which is very helpful to get all the information.
To start an interactive, I will run the following command. Note that you also need to know what your project name/account name is. For Purdue, the GPU project name is different from the CPU project name.
1
srun --partition=gpu-debug --pty --account=cis220161-gpu --ntasks=1 --cpus-per-task=4 --gres=gpu:1 --mem=16G -t 00:30:00 /bin/bash
Note that Purdue Anvil allows the maximum running time of 30 minutes in gpu-debug queue. If you set a higher number, you will get an error of
QOSMaxWallDurationPerJobLimit. If you are trying to run my example GPU task, it might take longer than 30 minutes to run because it trains a series of EfficientNet models. You may want to use thegpupartition instead ofgpu-debug.
After the allocation is assigned, we will also be directed into the compute node with GPU access. We can run nvidia-smi to ensure we are in. I have the following result.
Wed Feb  5 16:07:50 2025
+-----------------------------------------------------------------------------------------+
| NVIDIA-SMI 560.35.03              Driver Version: 560.35.03      CUDA Version: 12.6     |
|-----------------------------------------+------------------------+----------------------+
| GPU  Name                 Persistence-M | Bus-Id          Disp.A | Volatile Uncorr. ECC |
| Fan  Temp   Perf          Pwr:Usage/Cap |           Memory-Usage | GPU-Util  Compute M. |
|                                         |                        |               MIG M. |
|=========================================+========================+======================|
|   0  NVIDIA A100-SXM4-40GB          On  |   00000000:41:00.0 Off |                  227 |
| N/A   29C    P0             51W /  400W |       1MiB /  40960MiB |      0%      Default |
|                                         |                        |             Disabled |
+-----------------------------------------+------------------------+----------------------+

+-----------------------------------------------------------------------------------------+
| Processes:                                                                              |
|  GPU   GI   CI        PID   Type   Process name                              GPU Memory |
|        ID   ID                                                               Usage      |
|=========================================================================================|
|  No running processes found                                                             |
+-----------------------------------------------------------------------------------------+
In Purdue Anvil and some other super machines, conda is not loaded by default. We can use module avail conda to find the installed Anaconda versions and select the one we like. I will just load the default version.
1
2
3
4
5
module load anaconda
conda create --name mygpu python=3.10
conda activate mygpu
# install the following dependencies for an example task I prepared for you
pip install torch torchvision matplotlib tensorboard numpy requests jupyter torchinfo tqdm
Then we can do the same thing as in PBS system to enable an SSH tunneling for Jupyter Notebook access.
1
jupyter notebook --no-browser --port=8889 --ip=0.0.0.0
On your personal computer, run the ssh command.
1
ssh -N -L 8889:g008.anvil:8889 x-yliu4@anvil
By the way, I can use a shortcut of anvil instead of the full domain name because I set up an entry in the ~/.ssh/config file as follows.
1
2
3
Host anvil
    User x-yliu4
    HostName anvil.rcac.purdue.edu
An example PyTorch task
I prepared an example GPU task that trains a PyTorch CNN model to classify Food101 datasets. The task uses a subset of the whole dataset that contains only 3 types of food: sushi, steaks, and pizza. It will train a series of models based on EfficientNet, display the results in Tensorboard and select the best model to do predictions.
The Purdue Anvil’s compute node has Internet access, so you can directly run the notebook inside the compute node. For those that have no Internet access, you need to download the dataset first. The code is available on Github: PyTorch Experiment Tracking. Use git to obtain the code.
1
git clone https://github.com/legendPerceptor/pytorch_experiment_tracking.git
I recommend you clone the repository first and enter the folder before you run the
jupyter notebookcommand, so when you access it from your browser, it will open the correct folder.
Also, it is important to add our conda virtual environment into the ipykernel using the following command, otherwise you cannot see the proper python interpreter in your jupyter notebook later.
1
python -m ipykernel install --user --name=mygpu --display-name "Python (mygpu)"
The notebook will download the Food101 dataset, and the default path is “data”, which means all the data will be downloaded into the “data” folder in your current directory. I would not run this in my home folder because there is only very limited storage (often less than 20GB). Most supercomputers provide a scratch folder or a project folder that allows much larger storage (your quota can reach 100TB). You might also want to run the code as a python file to download the dataset beforehand to avoid too long warning output inside the notebook.
1
2
3
4
5
6
7
8
# Download the whole food101 dataset
import torchvision.datasets as datasets
import torchvision.transforms as transforms

train_data = datasets.Food101(root=DATA_PATH, split="train", download=True)
test_data =  datasets.Food101(root=DATA_PATH, split="test", download=True)
class_names = train_data.classes
print("exmaple classes:", class_names[:10])
The PyTorch training loop can be too long to be put inside the Notebook as it is not the purpose for this tutorial. I put those code into a PyTorch Modular repo. You can download the code using git clone or directly install the package into your python environment with pip. The notebook will use functions in this module.
1
pip install git+https://github.com/legendPerceptor/pytorch_modular.git
Now you can open your browser can paste the URL + token generated by your jupyter notebook command. Run all the cells and enjoy the convenient usage of GPUs on a supercomputer!
Run the tensorboard on a dedicated port in your compute node:
1
tensorboard --logdir ./runs --port 6006 --host 0.0.0.0
To see the tensorboard results, when you use the ssh tunneling, forward 2 ports instead of just 1.
1
ssh -N -L 8889:g015.anvil:8889 -L 6006:g015.anvil:6006 x-yliu4@anvil
If you run my example training and evaluation task, you can see the tensorboard result similar to the one below (by going to your browser and type in http://127.0.0.1:6006).
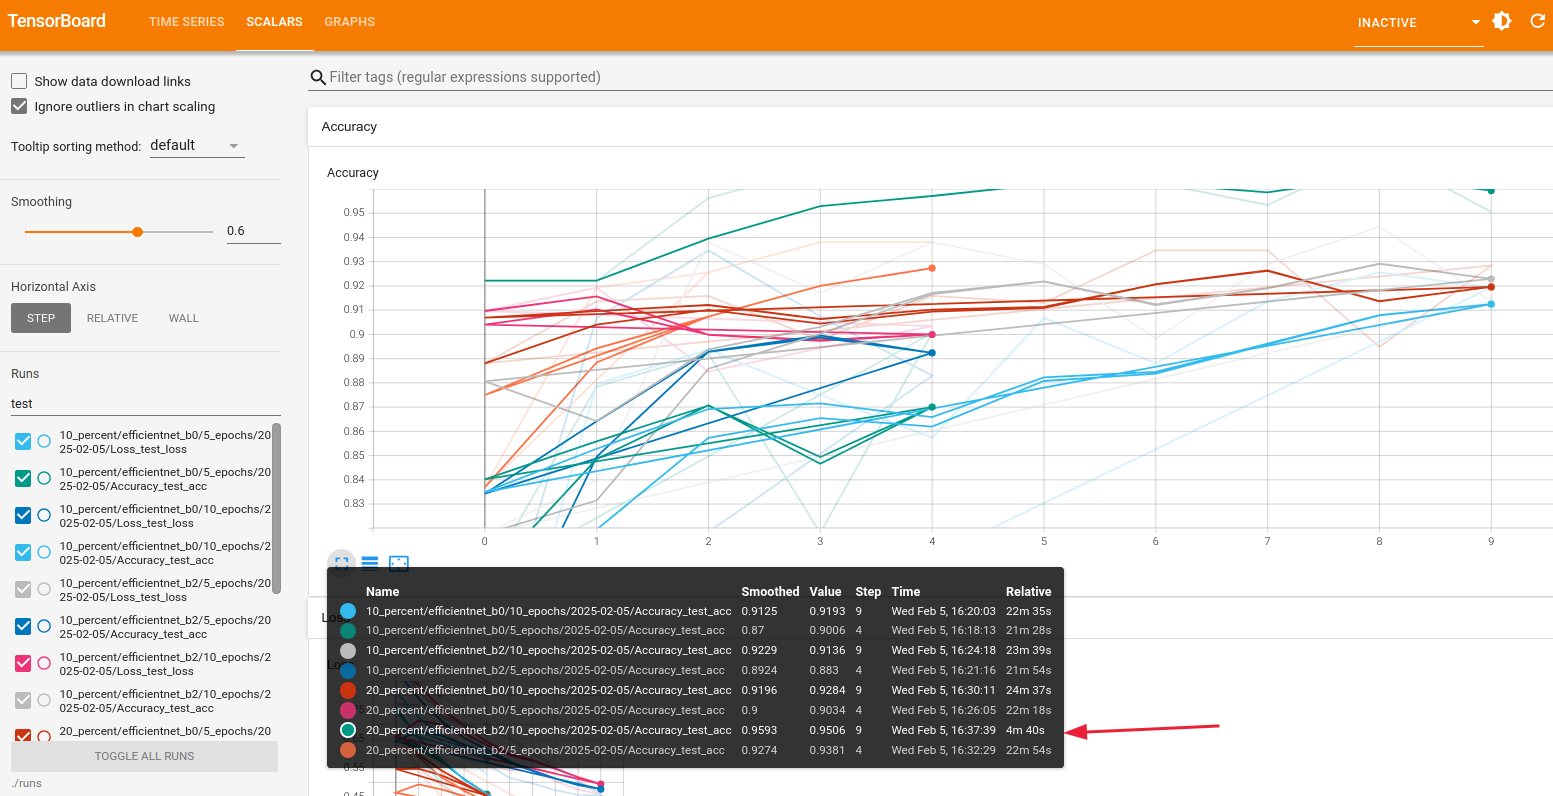 The best model is EfficientNetB2 with 20 percent of data.